


Pyatigorsk updated April 10th, 2018 current version 1.0.1
I created 4 separate User Modes for the Pioneer S9 to work with Serato DJ to provide additional functionality. Out of the box, the S9 does not let you separate the samples from the cue points like the Rane 72 has that is about to drop. This MIDI Mapping will add pad modes to offer both cues and samples together.
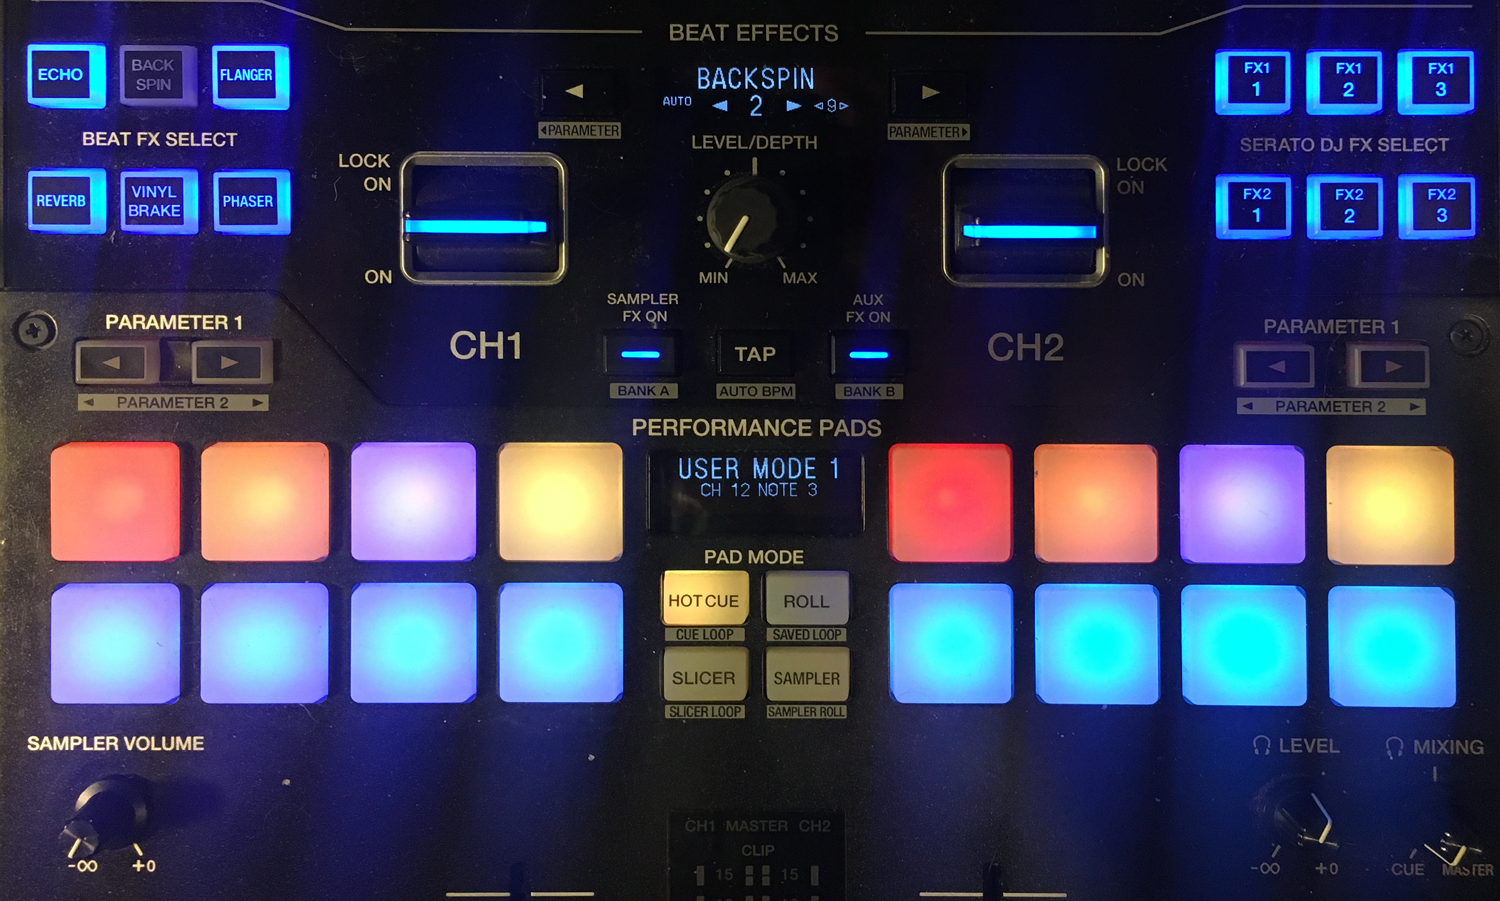
The first mode makes all the bottom pads your sampler while the top pads are your first 4 cue points for each deck. Now you can user your sample banks to throw in your drops without switching pad modes.
The second mode does the same on the top pads but instead of the sampler on the bottom, it makes the those pads loop rolls because I missed having the rolls readily available on the sides of the mixer without having to switch pad modes. I mirrored these so the smaller rolls are closer to their respective decks.
The third and fourth modes split your cues to one side and your sample bank to the other side; one for the left side and one for the right side.
[ If you like my mapping, please consider voting for me in the Ahhyeah Philly Battle here: http://ahhyeah.co/amplify#view=gallery&for=5X9F_nd-MSw ]
http://toastmeetsjam.com/build-your-brand/brand-personality/attachment/whiteback-2/ Update: I finally made a demo video for this:
Below you will find a more detailed breakdown of all these new pad modes. If you find this XML useful and want to throw me a tip You can Venmo or Paypal any amount you’d like! My user name is @haveboard pretty much everywhere, but specifically on Venmo or Paypal. Considering it buying me a drink virtually. I don’t actually drink alcohol, though but cheers to you either way!
Installation
- Download from the link above or clone the files to your computer from the green button on the upper right side of this GitHub Repo.
- Place the
s9_custom_user_modes_by_haveboard.xmlfile into your Serato MIDI XML Directory:- Mac:
/Users/_YOUR_USER_NAME_/Music/_Serato_/MIDI/Xml - Windows:
C:\Users\_YOUR_USER_NAME_\Music\_Serato_\MIDI\Xml
- Mac:
- Go into Serato DJ Settings under the MIDI tab, select the
s9_custom_user_modes_by_haveboardoption from the MIDI PRESET list and then select “load” to load the custom MIDI XML file. - To enable one of the Custom User Modes, press
SHIFT+ one of the PAD MODE buttons twice to enter the respective User Mode:- User Mode 1 –
SHIFT + HOT CUE x2Cues & Samples - User Mode 2 –
SHIFT + ROLL x2Cues & Rolls - User Mode 3 –
SHIFT + SLICER x2Left Cues Left & Right Pads Sample Deck - User Mode 4 –
SHIFT + SAMPLER x2Left Pads Sample Deck & Right Cues Right
- User Mode 1 –
User Modes Explained
Pads are numbered starting top left, left to right, separated by left pads and right pads.
User Mode Shortcuts
If you go into your DJM-S9 Settings Utility under Preference you can check PAD MODE options so you can press the pad mode button 3 times instead of holding SHIFT + PAD MODE BUTTON to get into the user modes.
User Mode 1 – Cues & Samples
- press
SHIFT + HOT CUE x2
Left Pads
- Cue 1 (Shift + Pad Deletes Cue)
- Red Shade – White Press
- Cue 2 (Shift + Pad Deletes Cue)
- Orange Shade – White Press
- Cue 3 (Shift + Pad Deletes Cue)
- Dark Purple Shade – White Press
- Cue 4 (Shift + Pad Deletes Cue)
- Yellow Shade – White Press
- Sample 1 (Blue Shades)
- Sample 2 (Blue Shades)
- Sample 3 (Blue Shades)
- Sample 4 (Blue Shades)
Right Pads
- Cue 1 (Shift + Pad Deletes Cue)
- Red Shade – White Press
- Cue 2 (Shift + Pad Deletes Cue)
- Orange Shade – White Press
- Cue 3 (Shift + Pad Deletes Cue)
- Dark Purple Shade – White Press
- Cue 4 (Shift + Pad Deletes Cue)
- Yellow Shade – White Press
- Sample 5 (Blue Shades)
- Sample 6 (Blue Shades)
- Sample 7 (Blue Shades)
- Sample 8 (Blue Shades)
For the rolls, I like the shorter rolls closer to the decks so the Rolls are mirrored from 1/8 on the outside to 1 on the inside for each deck
User Mode 2 – Cues & Rolls
- press
SHIFT + ROLL x2

Left Pads
- Cue 1 (Red Shade – White Press)
- Shift + Pad Deletes Cue
- Cue 2 (Orange Shade – White Press)
- Shift + Pad Deletes Cue
- Cue 3 (Dark Purple Shade – White Press)
- Shift + Pad Deletes Cue
- Cue 4 (Yellow Shade – White Press)
- Shift + Pad Deletes Cue
- 1/8 note Loop Roll (Green Shades)
- 1/4 note Loop Roll (Green Shades)
- 1/2 note Loop Roll (Green Shades)
- 1 note Loop Roll (Green Shades)
Right Pads
- Cue 1 (Red Shade – White Press)
- Shift + Pad Deletes Cue
- Cue 2 (Orange Shade – White Press)
- Shift + Pad Deletes Cue
- Cue 3 (Dark Purple Shade – White Press)
- Shift + Pad Deletes Cue
- Cue 4 (Yellow Shade – White Press)
- Shift + Pad Deletes Cue
- 1 note Loop Roll (Green Shades)
- 1/2 note Loop Roll (Green Shades)
- 1/4 note Loop Roll (Green Shades)
- 1/8 note Loop Roll (Green Shades)
User Mode 3 – Left Cues Left & Right Pads Sample Deck
- press
SHIFT + SLICER x2

Left Pads
- Cue 1 (Red Shade – White Press)
- Shift + Pad Deletes Cue
- Cue 2 (Orange Shade – White Press)
- Shift + Pad Deletes Cue
- Cue 3 (Dark Purple Shade – White Press)
- Shift + Pad Deletes Cue
- Cue 4 (Yellow Shade – White Press)
- Shift + Pad Deletes Cue
- Cue 5 (Dark Green Shade – White Press)
- Shift + Pad Deletes Cue
- Cue 6 (Pink Shade – White Press)
- Shift + Pad Deletes Cue
- Cue 7 (Light Green Shade – White Press)
- Shift + Pad Deletes Cue
- Cue 8 (Light Purple Shade – White Press)
- Shift + Pad Deletes Cue
Right Pads
- Sample 1 (Blue Shades)
- Sample 2 (Blue Shades)
- Sample 3 (Blue Shades)
- Sample 4 (Blue Shades)
- Sample 5 (Blue Shades)
- Sample 6 (Blue Shades)
- Sample 7 (Blue Shades)
- Sample 8 (Blue Shades)
User Mode 4 – Left Pads Sample Deck & Right Cues Right
- press
SHIFT + SAMPLER x2

Left Pads
- Sample 1 (Blue Shades)
- Sample 2 (Blue Shades)
- Sample 3 (Blue Shades)
- Sample 4 (Blue Shades)
- Sample 5 (Blue Shades)
- Sample 6 (Blue Shades)
- Sample 7 (Blue Shades)
- Sample 8 (Blue Shades)
Right Pads
- Cue 1 (Shift + Pad Deletes Cue)
- Red Shade – White Press
- Cue 2 (Shift + Pad Deletes Cue)
- Orange Shade – White Press
- Cue 3 (Shift + Pad Deletes Cue)
- Dark Purple Shade – White Press
- Cue 4 (Shift + Pad Deletes Cue)
- Yellow Shade – White Press
- Cue 5 (Dark Green Shade – White Press)
- Shift + Pad Deletes Cue
- Cue 6 (Pink Shade – White Press)
- Shift + Pad Deletes Cue
- Cue 7 (Light Green Shade – White Press)
- Shift + Pad Deletes Cue
- Cue 8 (Light Purple Shade – White Press)
- Shift + Pad Deletes Cue
Parameter buttons
The parameter buttons for all user modes select Sample Bank’s A, B, C, and D, left to right respectively.Parameter buttons for banks have been removed as it caused the parameters to not work properly for other modes. Hat tip to DJ Harley Beretta for making me aware.
Once again, if you find this useful and feeling generous, you can Venmo or Paypal any amount you’d like!
Thanks and happy DJing! If you happen to use this file and make any videos using it I’d love to see them! Shout me a message with a link, I’d love to check it out!
You Da Man!!!
Thanks for sharing the custom midi mapping! I’ve been trying to find family and friends that know how to code. Salute!
I’m like Randy Newman up in here!
Have you got any Midi user modes where slicer is on one side and cues on the other for a Djm s9
hello thanks for the work but all the samples play together i dont can use
What do you mean? Do you mean like one shot samples? Is there another way you are accomplishing this with other hardware?
hello the sampels in the Sampel banks all the blu pads working allone witout taching ther starts whe i loading your xml midi file i dont can stop the sampels i use a pioneer s9 with serato pro 2.1 on a macbook all the other pads i think its working only the 16 pads in sampelmode are flackering and play the sampels alone
I cannot understand what you are trying to say, sorry. maybe post a video somewhere and send it to me to show me?
hi,
I have some questions regarding this custom midi map.
is it possible to do something like this on the pad controls, but without using the user mode?
I mean, could I reassign all the functions of the pad selector, and pad buttons ?
I would like to customize, for example, the “roll mode” as “saved loop”.
I would also like to set different color light, changing the standard “green” light for the roll to orange, etc
Last thing. Is it possible to reassign the way the pads work. I would like to have a feedback for the hot cue when I press and release them (changing the background light).
Are all these things possible to do or is there an hardware and software limitation ?
Thanks
> is it possible to do something like this on the pad controls, but without using the user mode?
>I mean, could I reassign all the functions of the pad selector, and pad buttons ?
Yes, I believe so, you would have to experiment with your own customization
>I would like to customize, for example, the “roll mode” as “saved loop”.
This mapping was customized by disecting the xml generated from serato’s basic mapping features and customized after heavy experimenting/trial and error to learn the codes as to what does what. You should be able to do what you are trying to do, but it would be heavy customization and my mapping wouldnt directly help you with that, but the code file or the code on github can be used as a guide to help learn what things are doing and what codes do what,
>I would also like to set different color light, changing the standard “green” light for the roll to orange, etc
Color coding is all custom programming. I had to learn all the corresponding numbers to color values and insert the code values manually into the xml.
>Last thing. Is it possible to reassign the way the pads work. I would like to have a feedback for the hot cue when I press and release them (changing the background light).
Again, this is all custom color coding leanred through trial and error and then implementing by writing the XML manually. It is doable however somewhat complex, depending on your expierience with coding and XML.
This should all be pretty doable and with some persistence you could figure it out with trial and error as well as using my mappings as references.
It is by no means an easy process and if you aren’t comfortable reading and understanding the XML code that is in my mappings then it would be pretty difficult.
Your questions is a pretty broad “can I customize the XML mapping” which is exactly what Ive done and built it to my own preferences as well as something that would work more universal for people. I chose not to customize the default user modes as that could be confusing to some people not understanding how this works.
I have another project in the works but it is being delayed at the moment which might offer an easy way for you to achieve what you are asking for but it isn’t ready. In the meantime, you’ll need to just try your own customizations based off of my mappings. The github page mentions in the posts have a lot of helpful info in the code comments as well.
wow I answered this twice lol
Hi, thanks for your answer! (sorry for being late).
In this period I decided again to experiment with the Midi Map and Serato.
I downloaded your last custom midi map and I have to say that is very interesting and really well done, but I would like to customize a User Mode in my personal way.
I have some questions about the User Mode:
1) Is it possible to map the same color that I assign with Serato (because they don’t change and they are always the same) ?
2) Is it possible to assign the light signal for the parameters buttons ?
3) Is it possible to replace the same things that you mapped in the user mode, but in
the normal pad sections (customizing the lights, colors, functions, etc) ?
4) Can i ask you what your new project is about ?
Thank you!
Hi,
any news about your project for the custom midi map ?
I’m trying to understand and mdi map my mixer by myself, starting from your preset, but it’s not easy for me
Thanks
Angelo
Hello now its Working Perfect ther have a driver issue at mine S9 Thanks grets Harryz
sounds about right, it sounded like a sampler player setting and not an issue with my mapping specifically
george yes i got your midi mapping xml file what solfware did you make the xml file with
I’m on a mac and use VSCode or BBEdit. TextWrangler is a free version of BBEdit.
It’s was made in a code editor, not any applications. It is just straight looking at and writing code.
Oi sou DJ e moro no Brasil e meu nome artistico é Nino Leal
eu ñ consegui instalar o plugin de seu midi poderia me ajudar ?
Hello
Thanks
Excuse me, where you can find s9 driver utility ?
the utility app (not a driver) is installed on your machine somewhere when you install the s9 drivers. , and will usually launch when opening it from the preference panel in serato.
between the text above and the video, it should be pretty straightforward to understand where to find it on your own machine.
Could you do a tutorial on how you wrote this? I’m a developer and want to customise my Seventy Two, but I couldn’t figure out the control codes, especially around modifiers, and was generally lost figuring out what version of what xml file was currently loaded and active, which threw my experimentation off.
Did you check my github? The original mapping should be commented pretty heavily.
It’s just some custom XML that I figured out with a LOT of trial and error.
hello Dj Haveboard, thank you for this great work that you do and that you share with us. I encountered a small problem with the new mapping. Sometimes, my sampler doesn’t works, I have to turn the sampler volume button to make the sampler work again. Have you ever encountered this problem?
Sorry for my bad english level
This is a feature, not a bug. See the post regarding the new mapping:
“Volume faders both also control the master volume of the Sample Banks
Set your Channel Faders to the tightest curve that way the volume only cuts out when the channel faders are already down, giving you better control over the master volume of the sample bank.
This can be a little weird to get use to at first but it works great once you get comfortable.”
https://djhaveboard.com/haveboard-x-as-one-s9-midi-mapping/